
 Contacte
Propòsit
El propòsit d’aquest apartat és introduïr al desenvolupador la programació amb WebFlux
Versió de Canigó
Els passos descrits en aquest document apliquen a la versió 3.4 del Framework Canigó
Introducció
El mes de Març del 2019 s’ha publicat la versió 3.4 del Framework Canigó. Aquesta versió incorpora la possibilitat d’utilitzar les funcionalitats de WebFlux
Per a passar una aplicació 3.2 a 3.4 hi ha disponible la següent guia “Actualització Canigó 3.2 a Canigó 3.4”
L’objectiu d’aquesta guia és mostrar els procediments necessaris poder utilitzar les funcionalitats WebFlux sobre un repositori reactiu amb Mongodb. El punt de partida d’aquesta guia és una aplicació creada amb el plugin de Canigó per Eclipse i actualitzada a la versió 3.4.0 de Canigó.
Introducció WebFlux
La programació funcional va néixer per poder proporcionar un desenvolupament orientat a l’aplicació de funcions declarades
Spring WebFlux proporciona endpoints web de forma funcional a més dels controlladors tradicionals, proporcionant un lleuger model de programació funcional on les funcions són utilitzades per enrutar i capturar peticions a més de la tradicional programació imperativa
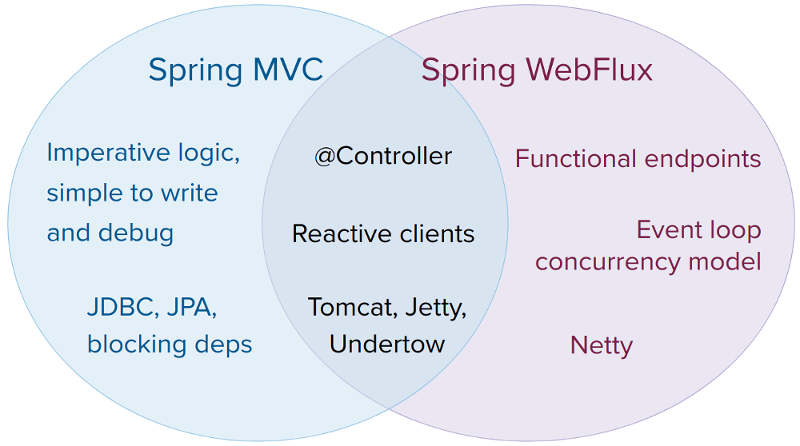
A la següent imatge es pot observar la comparativa de funcionalitats entre Spring MVC i Spring WebFlux
Per a poder utilitzar WebFlux és necessari utilitzar un contenidor d’aplicacions que suporti Servlet 3.1+
Spring WebFlux està suportat a Tomcat, Jetty, Netty, Undertow i contenidors Servlet 3.1+
El quadre següent mostra les funcionalitats que utilitza WebFlux dels servidors d’aplicacions:
| Servidor | Api utilitzada |
|---|---|
| Netty | Netty API |
| Undertow | Undertow API |
| Tomcat | Servlet 3.1 non-blocking I/O; Tomcat API per escriure i llegir ByteBuffers vs byte[] |
| Jetty | Servlet 3.1 non-blocking I/O; Jetty API per escriure ByteBuffers vs byte[] |
| Contenidor amb suport Servlet 3.1+ | Servlet 3.1 non-blocking I/O |
Per a més informació sobre programació funcional amb Spring 5 podeu consultar: https://docs.spring.io/spring-framework/docs/5.1.5.RELEASE/spring-framework-reference/web-reactive.html#webflux-fn
Spring MVC o WebFlux
Els següents punts són un resum dels punts que s’han de tenir en compte a l’hora de decidir-se per utilitzar Spring MVC o WebFlux en una aplicació:
-
Si l’aplicació amb Spring MVC funciona correctament, no hi ha necessitat de canvi
-
Si necessites un web stack amb non-blocking, Spring WebFlux et proporcionarà el màxim de funcionalitats reactives
-
Si necessites una aplicació el més lleugera possible, amb programació web funcional i utilització de lambdas de Java 8, Spring WebFlux et proporcionarà endpoint web funcionals
-
Si l’aplicació utilitza apis de persistència bloquejants (JPA, JDBC) o apis externes bloquejants, Spring MVC és la millor solució
-
Encara que la teva aplicació hagi de ser amb Spring MVC, els controlladors de Spring MVC poden cridar a altres components reactius com serveis remots o repositoris de dades no bloquejants
Si teniu dubtes a l’hora de decidir-vos utilitzar Spring MVC o WebFlux, no dubteu en posar-vos en contacte amb el CS Canigó al servei CAN del JIRA CSTD o enviant-nos un mail a la bústia del CS Canigó
Introducció cas d’exemple
Per il·lustrar aquesta guia utilitzarem un repositori de dades on hi contindrà missatges homòlegs a un tweet, on tindrà un id, un text i una data de creació
Pel repositori de dades utilitzarem una base de dades Mongodb
En l’exemple exposarem un CRUD de serveis rest sobre l’entitat tweet i exposarem 2 serveis rest de tipus stream utilitzant controllers per l’exposició dels serveis en el path “/tweets”
Per mostrar la forma de programació web funcional exposarem 2 dels serveis del CRUD anterior (obtenir tots els tweets i obtenir un tweet pel seu id ) mitjançant la definició de l’enrutament directament a les “RouterFuntions” en el path “/route-flux/tweets” i exposarem aquests mateixos serveis mitjançant “Handlers” en l’enrutament de les “RouterFuntions” en el path “/handler-flux/tweets”
Exemple
Per l’exemple utilitzarem una base de dades Mongodb en local al port 27017 amb una base de dades amb nom “canigo_persistence_mongo”
Començarem incorporant el starter de Spring Boot per WebFlux
		<dependency>
			<groupId>org.springframework.boot</groupId>
			<artifactId>spring-boot-starter-webflux</artifactId>
			<exclusions>
				<exclusion>
					<groupId>org.springframework.boot</groupId>
					<artifactId>spring-boot-starter-logging</artifactId>
				</exclusion>
			</exclusions>
		</dependency>
Enlloc de:
		<dependency>
			<groupId>org.springframework.boot</groupId>
			<artifactId>spring-boot-starter-web</artifactId>
			<exclusions>
				<exclusion>
					<groupId>org.springframework.boot</groupId>
					<artifactId>spring-boot-starter-logging</artifactId>
				</exclusion>
			</exclusions>
		</dependency>
Actualment els mòduls “canigo.web.core”, “canigo.web.rs” i “canigo.operation.logging” estan desenvolupats sobre Spring MVC. WebFlux i Spring MVC son dos desenvolupaments separts, per tant, necessitarem eliminar les dependències a aquests mòduls
Afegirem les dependències de Mongodb
		<dependency>
			<groupId>cat.gencat.ctti</groupId>
			<artifactId>canigo.persistence.mongodb</artifactId>
			<version>${canigo.persistence.mongodb.version}</version>
		</dependency>
		<dependency>
			<groupId>org.springframework.boot</groupId>
			<artifactId>spring-boot-starter-data-mongodb-reactive</artifactId>
			<exclusions>
				<exclusion>
					<artifactId>spring-boot-starter-logging</artifactId>
					<groupId>org.springframework.boot</groupId>
				</exclusion>
			</exclusions>
En aquest cas, com que utilitzarem alguna funcionalitat de reactiu, necessitem incorporar la dependència de Mongo db reactive de Spring Boot
Per a més informació sobre utilització de mongo reactiu podeu consular la guia d’Utilització de mongo db reactiu
Afegirem la propietat per la connexió a Mongodb
*.mongodb.uri=mongodb://127.0.0.1:27017/canigo_persistence_mongo?socketTimeoutMS=5000
Necessitem crear un configurador que extengui de cat.gencat.ctti.canigo.arch.persistence.mongodb.config.ReactiveMongoCoreConfig que crearà la connexió a la base de dades Mongodb a partir del String de connexió, un exemple de configurador podria ser:
import org.springframework.context.annotation.Configuration;

import cat.gencat.ctti.canigo.arch.persistence.mongodb.config.ReactiveMongoCoreConfig;

@Configuration
public class ReactiveMongoConfig extends ReactiveMongoCoreConfig {


}
Crearem el repository de l’entitat Tweet, utilitzarem les funcionalitats que aporta Spring per a repositoris reactius amb Mongo amb ReactiveMongoRepository
import org.springframework.data.mongodb.repository.ReactiveMongoRepository;
import org.springframework.data.mongodb.repository.Tailable;
import org.springframework.stereotype.Repository;

import cat.gencat.ctti.model.Tweet;
import reactor.core.publisher.Flux;

@Repository
public interface TweetRepository extends ReactiveMongoRepository<Tweet, String> {

	@Tailable
	Flux<Tweet> findTweetsBy();

}
Hem definit un mètode de consulta de tweets de tipus “Tailable” per mantenir la connectivitat esperant a nous tweets
Per a utilitzar aquest mètode la collection de Mongo ha de ser de tipus capped. Si la collection és de tipus capped no es pot utilitzar la funcionalitat d’eliminació d’elements. Si s’utilitza tailable a una collection no capped o s’eliminen elements a una collection capped s’obtindrà un error. Per tenir un exemple complet exposarem un servei utilitzant tailable i un servei d’eliminació d’elements però en un cas real no podrien conviure a la mateixa collection
Per simplificar l’exemple utilitzarem directament el repositori al controller, recomanem, però, utilitzar la capa service entre els controllers i els repositoris
import javax.validation.Valid;

import org.springframework.beans.factory.annotation.Autowired;
import org.springframework.http.HttpStatus;
import org.springframework.http.MediaType;
import org.springframework.http.ResponseEntity;
import org.springframework.web.bind.annotation.DeleteMapping;
import org.springframework.web.bind.annotation.GetMapping;
import org.springframework.web.bind.annotation.PathVariable;
import org.springframework.web.bind.annotation.PostMapping;
import org.springframework.web.bind.annotation.PutMapping;
import org.springframework.web.bind.annotation.RequestBody;
import org.springframework.web.bind.annotation.RequestMapping;
import org.springframework.web.bind.annotation.RestController;

import cat.gencat.ctti.model.Tweet;
import cat.gencat.ctti.repository.TweetRepository;
import reactor.core.publisher.Flux;
import reactor.core.publisher.Mono;

@RestController
@RequestMapping("/tweets")
public class TweetController {

    @Autowired
    private TweetRepository tweetRepository;

    @GetMapping
    public Flux<Tweet> getAllTweets() {
        return tweetRepository.findAll();
    }

    @PostMapping
    public Mono<Tweet> createTweets(@Valid @RequestBody Tweet tweet) {
        return tweetRepository.save(tweet);
    }

    @GetMapping("/{id}")
    public Mono<ResponseEntity<Tweet>> getTweetById(@PathVariable(value = "id") String tweetId) {
        return tweetRepository.findById(tweetId)
                .map(savedTweet -> ResponseEntity.ok(savedTweet))
                .defaultIfEmpty(ResponseEntity.notFound().build());
    }

    @PutMapping("/{id}")
    public Mono<ResponseEntity<Tweet>> updateTweet(@PathVariable(value = "id") String tweetId,
                                                   @Valid @RequestBody Tweet tweet) {
        return tweetRepository.findById(tweetId)
                .flatMap(existingTweet -> {
                    existingTweet.setText(tweet.getText());
                    return tweetRepository.save(existingTweet);
                })
                .map(updateTweet -> new ResponseEntity<>(updateTweet, HttpStatus.OK))
                .defaultIfEmpty(new ResponseEntity<>(HttpStatus.NOT_FOUND));
    }

    @DeleteMapping("/{id}")
    public Mono<ResponseEntity<Void>> deleteTweet(@PathVariable(value = "id") String tweetId) {

        return tweetRepository.findById(tweetId)
                .flatMap(existingTweet ->
                        tweetRepository.delete(existingTweet)
                            .then(Mono.just(new ResponseEntity<Void>(HttpStatus.OK)))
                )
                .defaultIfEmpty(new ResponseEntity<>(HttpStatus.NOT_FOUND));
    }

    // Tweets are Sent to the client as Server Sent Events
    @GetMapping(value = "/event-stream", produces = MediaType.TEXT_EVENT_STREAM_VALUE)
    public Flux<Tweet> eventStreamTweets() {
        return tweetRepository.findTweetsBy();
    }

    // Tweets are Sent to the client as stream json
    @GetMapping(path = "/stream-json", produces = MediaType.APPLICATION_STREAM_JSON_VALUE)
    public Flux<Tweet> streamJsonTweets() {
        return tweetRepository.findTweetsBy();
    }

}
En aquest controller exposem un CRUD de serveis rest sobre el path “/tweets” i dos serveis en stream: “/tweets/event-stream” per enviar tweets produint “text/event-stream” i “/tweets/stream-json” per enviar tweets produint “application/stream+json” per simular un efecte de tipus timeline
Exposició serveis mitjançant definició de l’enrutament a les “RouterFuntions”
Per a la definició els serveis amb programacio web funcional necessitem definit les “RouterFunctions”, en aquest cas definirem les “RouterFunctions” directament a la seva definició
Per això definirem un “Configuration” amb la definició dels dos serveis web, un exemple seria:
import org.springframework.context.annotation.Bean;
import org.springframework.context.annotation.Configuration;
import org.springframework.web.reactive.function.server.RequestPredicates;
import org.springframework.web.reactive.function.server.RouterFunction;
import org.springframework.web.reactive.function.server.RouterFunctions;
import org.springframework.web.reactive.function.server.ServerResponse;

import cat.gencat.ctti.model.Tweet;
import cat.gencat.ctti.repository.TweetRepository;

@Configuration
public class TweetRouteRouterFuntionConfig {

	@Bean
	RouterFunction<ServerResponse> routeFluxRouterFunction(TweetRepository tweetRepository) {
		return RouterFunctions
				.route(RequestPredicates.GET("/route-flux/tweets"),
						serverRequest -> ServerResponse.ok().body(tweetRepository.findAll(), Tweet.class))
				.andRoute(RequestPredicates.GET("/route-flux/tweets/{id}"), serverRequest -> ServerResponse.ok()
						.body(tweetRepository.findById(serverRequest.pathVariable("id")), Tweet.class));
	}

}
On s’utilitza les “FunctionalInterface” i lambdas de Java per determinar quin mètode del repositori s’utilitza per cada una de les rutes definides
Exposició serveis mitjançant “Handlers” en l’enrutament de les “RouterFuntions”
En aquest cas utilitzarem “Handlers” en l’enrutament de les “RouterFunctions”, per separar l’enrutament de la lògica de dins de l’enrutament
Per això definirem un “Configuration” amb la definició dels dos serveis web, un exemple seria:
import org.springframework.beans.factory.annotation.Autowired;
import org.springframework.context.annotation.Bean;
import org.springframework.context.annotation.Configuration;
import org.springframework.stereotype.Component;
import org.springframework.web.reactive.function.server.RequestPredicates;
import org.springframework.web.reactive.function.server.RouterFunction;
import org.springframework.web.reactive.function.server.RouterFunctions;
import org.springframework.web.reactive.function.server.ServerRequest;
import org.springframework.web.reactive.function.server.ServerResponse;

import cat.gencat.ctti.model.Tweet;
import cat.gencat.ctti.repository.TweetRepository;
import reactor.core.publisher.Mono;

@Configuration
public class TweetHandlerRouterFuntionConfig {

	@Bean
	RouterFunction<ServerResponse> handlerFluxRouterFunction(TweetHandler tweetHandler) {
		return RouterFunctions
				.route(RequestPredicates.GET("/handler-flux/tweets"), tweetHandler::getAllTweets)
				.andRoute(RequestPredicates.GET("/handler-flux/tweets/{id}"), tweetHandler::getTweetById);
	}

}

@Component
class TweetHandler {

	@Autowired
	private TweetRepository tweetRepository;

	public Mono<ServerResponse> getAllTweets(ServerRequest serverRequest) {
		return ServerResponse.ok().body(tweetRepository.findAll(), Tweet.class);
	}

	public Mono<ServerResponse> getTweetById(ServerRequest serverRequest) {
		return ServerResponse.ok().body(tweetRepository.findById(serverRequest.pathVariable("id")), Tweet.class);
	}

}
On s’utilitza les “FunctionalInterface” de Java per determinar quin mètode s’utilitza de la classe “Handler” intern “TweetHandler”
Test serveis rest
Si provem els serveis web:
- /tweets
- /route-flux/tweets
- /handler-flux/tweets
Per exemple, per provar el servei “/tweets”:
curl -X POST \
  http://localhost:8080/tweets \
  -H 'Content-Type: application/json' \
  -d '{"text":"Hello, World!"}'
i els serveis web:
- /tweets/{id}
- /route-flux/tweets/{id}
- /handler-flux/tweets/{id}
Per exemple, per provar el servei “/tweets/{id}”:
curl -X GET \
  http://localhost:8080/tweets/99
Podrem observar que retornen la mateixa informació